Running ImageMagick from CoolTweak
Creating an ImageMagick command
First of all, create a new menu with a custom command and rename it to "ImageMagick test" for instance.
This process is described step by step here if you're not too sure about how this is done .
Now, you have to tell CoolTweak what it has to do, here we have to call ImageMagick executable and to provide it some parameters.
In the case of gaussian blur, original ImageMagick syntax is like:
magick.exe myfile.jpg -blur 2x2 newfile.jpg
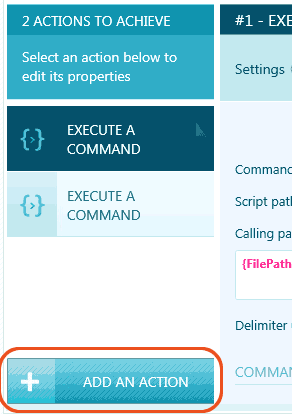
- Command type: Executable file
- Script path: C:\ImageMagick\magick.exe
- Calling parameters: {FilePath} -blur 2x2 {FilePath}
- Check option: Wait for the command to end before continuing
- Select option: After the command ends, Reload the file from its current location
Well, that’s settled, ImageMagick will be called on each file, will apply a blur and then will replace the current temporary file by its blurry version.
We also told CoolTweak to reload the processed file so it takes into account the blurred version of the picture for the next steps of the processing.
To check that everything is properly configured, it's a good habit to immediately test if the command meets your
expectations by using the "test these settings" button in the top right corner.
Enter a file path and hit "Test" button to run your command on it.
After the processing ends, a log file automatically displays and presents all details about the command execution
(as well as its potential errors).
The processed file is also shown in Windows explorer so you can check its contents.
Calling parameters
The only part that may be unclear is the use of the variable {FilePath} which represents the full path of the file that will be processed.
Before running each action, CoolTweak makes a copy the current file into a temporary file and stores its path into the {FilePath} variable
{FilePath} -blur 2x2 {FilePath} is the way to overwrite this temporary file with its blurred version (the real original file remains unchanged).
Please note that CoolTweak automatically deletes all temporary files once the processing is done. You won’t be able to access temporary files after the end of the processing.
File reloading options
Here, the processed file replaces the provided one but we could have saved the processed file elsewhere and asked CoolTweak to reload it from this location.
For instance, with the parameters:
{FilePath} -blur 2x2 "{OriginalFileDirectoryPath}processed-{OriginalFileNameWithoutExtension}{OriginalFileNameExtension}",
we request ImageMagick to save the processed file in the original file folder.
If the original file is C:\my\file.jpg, then with these parameters the blurred file will be saved at C:\my\processed-file.jpg.
To make CoolTweak reload the file from this location, you will have to select the "Reload the file from a predefined path" option and set the following path:
{OriginalFileDirectoryPath}processed-{OriginalFileNameWithoutExtension}{OriginalFileNameExtension}
in the associated text field.
Chaining with another command
Start by adding a new custom command to your menu by clicking the "Add an action" button.
To draw a frame around a picture, ImageMagick original syntax is like:
magick.exe myfile.jpg -frame 5x5+2+2 newfile.jpg
- Command type: Executable file
- Script path: C:\ImageMagick\magick.exe
- Calling parameters: {FilePath} -frame 5x5+2+2 {FilePath}
- Check option: Wait for the command to end before continuing
- Select option: After the command ends, Reload the file from its current location
That's is, CoolTweak is going to take the previous blurred image and then ask ImageMagick to add a frame around it.
)
And now ?
Now, you menu is ready to use, you just have to save your changes (with the lower right button of menu editor) to be able to run your commands from a single right click on your files and folders.
ImageMagick is a really mighty library, there are tons of possibilities to explore and to play with.
If you ever find crazy cool new features during your experiments and you consider they
should be available natively in CoolTweak, don't hesitate to share with us, all your suggestions are always welcome.
Happy coding !